If you are one of those people like me who have swapped SIM cards, used couple of different backup apps, synced contacts may times with different account when it was unnecessary, or all of it! And in the end, got stuck with a phonebook that says the same name five times in a row? Or even worse, says the same number five times in five different locations under five different names! If any of this relates to you, I know the feeling! And… I had to do the Math. But luckily, therefore, you don’t have to! Enough of the talk! Game on! There are actually 3 methods to Remove Duplicate Contacts from your phonebook.So here we share the step by step methods On How to Remove Duplicate Contacts from Android [su_box title=”Related Guides:” box_color=”#382bf6″ radius=”2″]
How To to Boot Into Recovery Mode On Android (Various Ways) How to Enable Developer Options, USB Debugging and OEM Unlock on Android
[/su_box]
How to Remove Duplicate Contacts from Your Device
Image Source: Pexel.com (Stock image Copyright free)
Dedicated Apps: (e.g: Duplicate Contacts)
You might have thought of this at some point, but then decided to search for the experts I bet. Apps are very handy; they can do wonders for you. And today, it saves the day again! You can fetch a couple of apps with the name “duplicate contacts remover”. Not very dense but the population of these are not as low as you think. Grab the one you find with the highest rating. Open it. Tap on whatever it says, but only reading after what it says it will do of course! And viola! You’re free of those doppelgangers in your phonebook. Though the most convenient way to get the dirty works done as much as in a single tap, it’s not the safest way. Unless you’re 100% sure about the contacts, they’re pretty good chances that these may take away a unique contact because it fitted the algorithm’s parameter and you’ll never know!
Native Contacts App:
This is not so quick and requires some efforts. But it’s safer and can be done without any additional apps. A choice for those who wants to save data or prevent apps from accessing sensitive data at all. Either way, this is the native method, an inbuilt feature of the Android OS. But unfortunately, not all the Android OS has this feature. If you are lucky, follow the steps. Open the ‘Contacts’ App. Tap the ‘Options’ button. It will open up a couple of options like Accounts, Import/Export, etc. Look for the term ‘Merge Accounts’. Tap on it. You will be asked for which accounts. Select ‘Google’ and click ‘Ok’ when asked. And that’s it! Duplicates are gone!
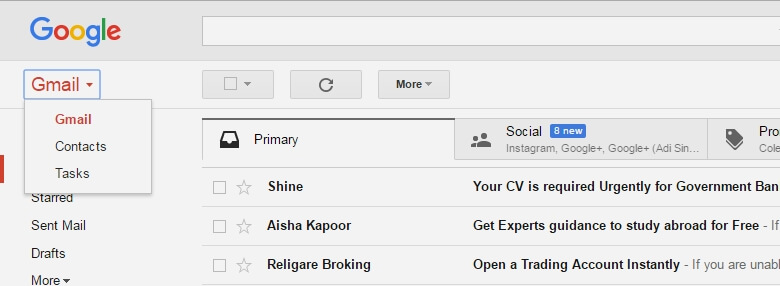
From Gmail using PC:
Let’s say you were unlucky and couldn’t find the ‘Merge Accounts’ option on your Android. We got another trick in the bag! If you’re reading this from PC, it’s much more convenient! You don’t even have to touch your phone to make this method work. Go to Gmail and open your Account, which is in sync with your phone. There’s ‘Gmail’ with a tiny down-pointing arrow right under ‘Google’ at the top-left corner. Click on it. Select ‘Contacts’ from the list. It’ll open in a new tab, with a brief demo of the things it can do. And at the left side, you can see a list in which it says ‘Find Duplicates’. Click on it. And, it will present you with all the contacts it can merge. You can either check it one by one, or the easy way, click on ‘Merge all’ at the top-right. And, the next time your phone sync, the duplicates will be gone like magic. 🙂
If this tutorial guide is helpful, then please share this with friends and family or if you have any question related to this post, feel free to leave that in the comment section